Doing crafts is indeed a great way to relieve stress. In my conversations with homeowners, I’ve noticed that they are increasingly unsatisfied with purchasing ready-made furniture and have started to try their hands at designing their own, from a small vase or a specimen decorative painting to a small side table or a storage cabinet… Each one is unique in the world. Today, I have invited several skillful homeowners to teach you how to DIY step by step. Don’t be intimidated if you think you’re not handy; we’ll start with 0-difficulty decorative paintings and vases before moving on to the more advanced side tables and chandeliers. After watching, I can’t help but feel itchy to buy materials and start making them right away (DIY furniture is not as difficult as imagined)!
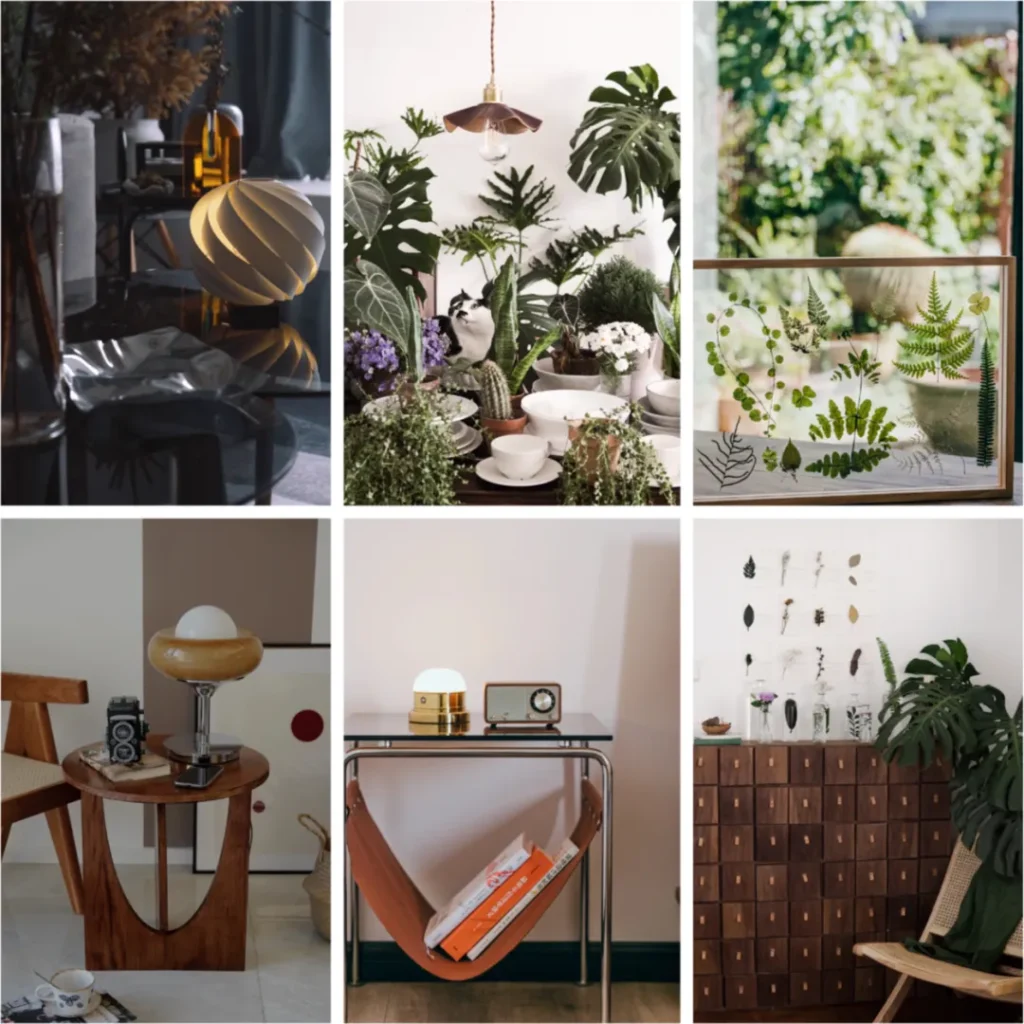
PART.1 Cost ≤ $20, 0 difficulty: Mu Xiaochun makes a painting and brings the forest home. Cost of plant specimen painting: $20. Hi, I’m Xiaochun, and today I’m here to share a tutorial on ‘bringing the forest home’ – plant specimen decorative painting. The last time I went to the pristine forest in Pingbian with my friends, I collected some leaves and brought them home, first sandwiching them in a book. Later, when I had some free time, I finally completed this painting. It was my first time making it, and I was feeling my way through, but I didn’t expect the finished product to be so beautiful, with a healing feeling at first glance.
This time, several discarded laundry detergent bottles at home, along with mineral water bottles, were transformed into artistic vases after some painting and drawing. It’s actually quite simple to make, but it requires some thought. Material preparation: Laundry detergent bottles, cardboard, latex paint, acrylic paint 1. First, freely create the shape. Add cardboard to the mouth of the laundry detergent bottle. (At first, mineral water bottles were used, but later it was changed to rolled-up cardboard, which is easier to shape.) 2. Cover the entire surface with ultra-light clay. Those who don’t want to bother can start painting after the clay dries. Those who pursue perfection can use latex paint to cover the clay with paper towels to create texture. 3. The last step is to paint freely. After it dries, it can be used as a vase. The feeling of turning waste into art is really fulfilling psychologically. I also made a small flower stool from a milk powder can. Isn’t it super cute? By Shen Yiming As days pass by, find the joy of a slow rhythm. Cost of the paper lamp: 10 yuan Hello everyone. I’m Yiming, a new friend. From the dark style of my home, you should be able to tell that I’m a boy. I officially started renovating furniture about a year and a half ago when I first moved into my new home. Facing the empty room and choosing soft furnishings for my home, I gradually saw many amazing furniture designs, and the idea of making something myself came to me. The inspiration for this paper lamp comes from a grass skirt floor lamp. I was attracted by its well-arranged line design. The texture reflected by the light through the gaps in the lines is so beautiful. At that time, I thought of making a table lamp in the same style. The materials are very simple and only cost 10 yuan. Many friends like it. Today, I’m sharing the making method with you. Material preparation: Paper cups, cardboard, double-sided tape, hot glue, LED strip 1. Use a soft ruler to measure and mark 11 – 12 intervals at the bottom of the paper cup to facilitate sticking the cardboard later. 2. Use hot glue to bond the cup mouths. 3. Fix the LED strip in a circle on the cup body. 4. Cut the cardboard into long strips (42cm * 3.5cm). 5. Stick double-sided tape on the long paper strip and stick it on layer by layer according to the intervals at the bottom of the cup. After making this lamp, seeing it shining brightly at night countless times gives me a great sense of accomplishment. Renovating furniture is a self-healing process for me. Nowadays, we are getting more and more used to the fast-paced life. As days pass by, it’s hard to experience the joy of life itself. The state of occasionally slowing down to do handicrafts allows me to experience the beauty of life in detail. PART.2 Hundred-yuan-level Makeovers By LilyLLeee In the old house, I made some unconventional furniture.
Handmade chandelier, cost: 50 yuan
Special-shaped mirror, cost: 100 yuan
Hello everyone. I’m Lily, a new friend here. I rented an old house with a building age of over 15 years. The wooden doors and floors are very old.
At the end of 2021, I wanted to redecorate this house. Like all renters, I didn’t want to spend too much money on rental renovation, but I also didn’t want my home to be clichéd.
At that time, I wanted a dining room chandelier. After looking around, they were either all the same or the price was far beyond my budget. One day when I was browsing Instagram, I saw a handmade cowhide lamp made by a foreign artist. It was very beautiful. Then I thought if I could make a simple version. After looking up information, I found that vegetable-tanned leather has plasticity, so I used my creativity and made this leather lamp. Let’s take a look at how to make it together.
Materials preparation:
Vegetable-tanned leather – It should be relatively hard, with a thickness of more than 1.8mm
Leather edge sealer – Only a little is needed. Buy the smallest size.
Leather sanding stick – Buy the cheapest one (mine cost 2 yuan)
Chandelier accessories – It is recommended to buy pure copper double-ring ones
E27 screw base bulb – Mine is 6w, with warm yellow light
Steps:
1. Find a bowl or plate of appropriate size, place it upside down on the leather and draw a circle, then cut out the circle with scissors.
2. Soak the circular leather in clean water for 20 minutes, then take it out and wipe it slightly dry.
3. Find a bowl in your favorite shape, cover the circular leather on it, and pinch out the shape you want with your hands.
4. Keep shaping with your hands until the leather gradually hardens.
5. Place it in a ventilated place to dry.
6. Cut a circular hole on the top according to the size of the accessories you bought.
7. Dip a little edge sealer and apply it to the leather edge. After it is slightly dry, sand it back and forth with the sanding stick.
8. Sand until the edge is smooth, like having a patina. Then it’s done.
Renovating furniture is really addictive. There are quite a few DIY furniture items in my home. Take this uniquely styled special-shaped mirror for example. The production method is also very simple.
Materials preparation for the special-shaped mirror:
A piece of special-shaped wooden board (thickness 12mm), custom-made small partitions, custom-made oval acrylic soft mirror, teak-colored wood wax oil, nail-free glue
Steps:
1. For the wooden board and partitions received, first apply wood wax oil with a cotton cloth to color them. After applying the wood wax oil three times, let it dry.
2. Fix the acrylic mirror on the wooden board with nail-free glue. Also apply nail-free glue on the back of the wooden board so that it can be fixed on the wall.
The clarity of the acrylic mirror is a bit poor, but I’m still quite satisfied with the overall shape of the mirror. It has a beautiful and retro texture.
Since I moved in, I have renovated many pieces of furniture. My most proud work is the following old Chinese medicine cabinet. Although the process is a bit cumbersome, fortunately the finished product is very beautiful.
When you truly desire to accomplish something, you will inevitably find a way to make it happen. This has been my philosophy since I began transforming furniture. I adore the feeling of these pieces blending into my home, with their aged appearance and the marks of time—this is the image of home I’ve always wanted. In July, interesting things are meant to be created with your own hands. Cost of the Mid-Century Side Table: 200 yuan Hello everyone, I’m July, perhaps you could call me a hands-on blogger. I’m always eager to try my hand at anything beautiful I come across. I hadn’t found a suitable coffee table for my new home and didn’t want one that was too conventional. Later, I came across the idea of a mid-century side table and decided to give it a try. The result was surprisingly great! Materials needed: Custom pinewood board (with corner brackets and screws), Shafei pine color paint. 1. After confirming the dimensions, request the merchant to cut the board to size and send the corner brackets and screws (the size of this tabletop is 50cm, and the height of the legs can be adjusted according to your needs. If you’re unsure about the dimensions for other parts, you can directly show the merchant the following image, and they will know how to configure them). 2. Apply paint and color, which usually requires three coats. Friends who prefer the natural wood color can skip this step. 3. After the color is applied, assemble according to the provided screws and touch up the paint on the edges and corners. This coffee table only cost around 200 yuan, and the style is indeed quite close to the mid-century look, with the elegant charm of a bygone era. Its size is just right, making it easy to move around, and it comes in handy for afternoon tea, reading books, and more—it’s an item that grows on you the more you use it. Xiao Chun also has a mid-century style small side table at home, and I’m sharing the method with you. Cost of Xiao Chun’s Mid-Century Leather Side Table: 750 yuan Materials needed: 304 stainless steel, 1.8mm Hallewin leather, 4mm brown glass (a solid stainless steel frame is a bit more expensive, but you can find lower-priced alternatives according to your needs). 1. Customize the basic stainless steel frame and get a piece of brown glass according to the frame’s dimensions. You can find these at local hardware/glass processing places or on the. 2. For the leather part, first measure the required length and width, use 1.8mm thick brown leather, and attach it to the stainless steel with silver rivets or four-claw buckles. 3. Finally, install the brown glass to complete the project. When it comes to choosing a bedside table, I don’t like them to be too uniform; a slightly different feel can be more interesting, so I chose to DIY a side table as a bedside table. For me, a bedside table doesn’t need too much storage space; it’s enough to hold a bedside lamp, alarm clock, a few books, and a glass of water. Regarding storage space, I’ve always believed that it’s not the more, the better. Too much storage space is often used to hide things rather than to organize them properly.
This edition of sharing has inspired me to purchase quite a few materials, especially the small cowhide pendant lamps. Their vintage beauty truly resonates with my heart. Have you noticed that many homeowners begin DIY furniture projects because they find the mass-market furniture to be monotonous? They want to design a unique feel for their home within their capabilities. This is how the first attempt comes about, and with success, there is joy.
Whether it’s crafting or making furniture, it is also a process of exploring one’s inner preferences and releasing stress. In the fast-paced era, being able to take a whole afternoon to focus on a lamp or a painting, and to meticulously refine the details bit by bit, is actually a very blissful experience. I hope you can find this small yet precious happiness too.
